How to build an inexpensive RAID for storage and streaming
I have written about this before and it is still my favorite mantra
There are people that take backups and there are people that never had a hard drive fail
This mantra is basically what should drive everyone to take regular backups of their electronic files, so as to ensure that nothing is lost in case of hardware failures.
Let’s face it. Hard drives or any magnetic media are man made and will fail at some point. When is what we don’t know, so we have to be prepared for it.
Services like Google Drive, iCloud, Dropbox, BoundlessCloud and others offer good backup services, ensuring that there is at least one safe copy of your data. But that is not enough. You should ensure that whatever happens, the memories stored in your pictures or videos, the important email communications, the important documents are all kept in a safe place and there are multiple backups of it. Once they are gone, they are gone for good, so backups are the only way to ensure that this does not happen.
Background
My current setup at home consists of a few notebooks, a mac-mini and a Shuttle computer with a 1TB hard drive, where I store all my pictures, some movies and my songs. I use Google Music Manager for my songs so that they are available at any time on my android phone, Picasa to be able to share my photos with my family and friends and Google Drive so as to keep every folder I have in sync. I also use RocksBox to stream some of that content (especially the movies) upstairs on either of our TVs through the Roku boxes we have.
Recently I went downstairs and noticed that the Shuttle computer (which run Windows XP at the time) was stuck in the POST screen. I rebooted the machine but it refused to load Windows, getting stuck either in the computer’s POST screen or in the Starting Windows.
Something was wrong and my best guess was the hard drive was failing. I booted up then in Safe mode (and that worked), set the hard drive to be checked for defects and rebooted again to let the whole process finish. After an hour or so, the system was still checking the free space and was stuck at 1%. The hard drive was making some weird noises so I shut the system down.
Although I had backups of all my files on the cloud through Picasa, Google Music Manager and Google Drive, I still wanted to salvage whatever I had in there just in case. I therefore booted up the system with a Linux live CD, mounted the hard drive and used FileZilla to transfer all the data from the Shuttle’s hard drive to another computer. There was of course a bit of juggling going on since I had to transfer data in multiple hard drives due to space restrictions.
Replacing the storage
I had to find something very cheap and practical. I therefore went to Staples and found a very nice (for the money) computer by Lenovo. It was only $300, offering 1TB 7200 SATA hard drive, i5 processor and 6GB of RAM.
As soon as I got the system I booted it up, started setting everything up and before the end of the day everything was back in place, synched to the cloud.
However the question remained: what happens if the hard drive fails again? Let’s face it, I did lose a lot of time trying to set everything up again so I wasn’t prepared to go through that again.
My solution was simple:
Purchase a cheap RAID (hardware) controller, an identical 1TB hard drive to the one I have, and a second hard drive to have the OS on. This way, the two 1TB hard drives can be connected to the RAID controller on a mirror setup (or RAID 1), while the additional hard drive can keep the operating system.
I opted for a solid state drive from Crucial for the OS. Although it was not necessary to have that kind of speed, I thought it wouldn’t hurt. It did hurt my pocket a bit but c’est la vie. For your own setup you can choose whatever you like.
Hardware
- HighPoint RocketRAID 620 2 SATA Port PCI-Express 2.0 x1 SATA 6Gb/s RAID Controller ($38.15) The RAID controller
- Crucial 128 GB m4 2.5-Inch Solid State Drive SATA 6Gb/s CT128M4SSD2 ($122.49) The OS drive
- HITACHI 0F10383 1TB SATA 3.0Gb/s 3.0 7200 RPM 32MB Buffer Hard Drive ($106.99) RAID array drive (the only reason I bought this particular drive is because it is identical to the one that came with the Lenovo system)
NOTE : For those that are not interested in having a solid state drive for the OS, one can always go with other, much cheaper drives such as this one.
Setup

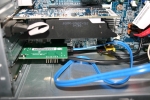
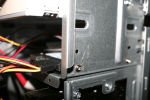
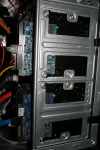
After all the components arrived, I opened the computer and had a look at what I am facing with. One thing I did not realize was the lack of space for the third hard drive (the one that will hold the OS). I was under the impression that it would fit under the DVD ROM drive, but I did not account for the SD card reader that was installed in that space, so I had to be a bit creative (Picture 1).
A couple of good measurements and two holes with the power drill created a perfect mounting point for the solid state hard drive. It is sitting now secure in front of the card reader connections, without interfering in any way.

The second hard drive and the raid card were really easy to install, just a couple of screws and everything was set in place.
The second hard drive ended up in the only expansion ‘bay’ available for this system. This is below the existing drive, mounted on the left side of the case. The actual housing has guides that allow you to slide the drive until the screw holes are aligned and from there it is a two minute job to secure the drive in place.
I also had a generic nVidia 460 1GRAM card, which I also installed in the system. This was not included in the purchases for building this system, but it is around $45 if not less now. I have had it for over a year now and it was installed in the old Shuttle computer, so I wasn’t going to let it go to waste.
With everything in place, all I had to do is boot the system up and enter the BIOS screen to ensure that the SSD drive had a higher priority than any other drive.

Once that was done, I put the installation disks in the DVD-ROM and restored the system on the SSD drive. 4 DVDs later (around 30 minutes) the system was installed and booted up. It took however another couple of hours until I had everything set up. The myriad of Windows Updates, (plus my slow Internet connection) contributed to this delay. However I have to admit, that the SSD drive was a very good purchase, since I have never seen Windows boot in less than 10 seconds (from power up to the login screen).
The Windows updates included the nVidia driver so everything was set up (well almost that is). The only driver not installed was for the HighPoint RaidRocket RAID controller.
The installation disk provided that driver, alongside with a web based configuration tool. After installing the driver and a quick reboot, the RAID configuration tool was not easy to understand but I figured it out, even without reading the manual.
Entering the Disk Manager, I initialized and formatted the drive and from then on, I started copying all my files in there.
As a last minute change, I decided not to install RocksBox and instead go with Plex Media Server. After playing around with Plex, I found out that it was a lot easier to setup than RocksBox (RocksBox requires a web server to be installed on the server machine, whereas Plex automatically discovers servers). Installing the relevant channel on my Roku boxes was really easy and everything was ready to work right out of the box so to speak.
Problems
The only problem that I encountered had to do with Lenovo itself. I wanted basically to install the system on the SSD drive. Since the main drive is 1TB and the SSD drive 128GB I could not use CloneZilla or Image for Windows to move the system from one drive to another. I tried almost everything. I shrank the 1TB system partition so as to make it fit in the 128GB drive. I had to shut hibernation off, reboot a couple of times in Safe Mode to remove unmovable files, in short it was a huge waste of time.
Since Lenovo did not include the installation disks (only an applications DVD), I called their support line and inquired about those disks. I was sent from the hardware department to the software department, where a gentleman informed me that I have to pay $65 to purchase the OS disks. You can imagine my frustration to the fact that I had already paid for the OS by purchasing the computer. We went back and forth with the technician and in the end got routed to a manager who told me I can create the disks myself using Lenovo’s proprietary software.
The create rescue process required 10 DVDs, so I started the process. On DVD 7 the process halted. I repeated the process, only to see the same error on DVD 4. The following day I called Lenovo hardware support and managed to talk to a lady who was more than willing to send me the installation disks free of charge. Unfortunately right after I gave her my address, the line dropped, so I had to call again.
The second phone call did not go very well. I was transferred to the software department again, where I was told that I have to pay $65 for the disks. The odd thing is that the technician tried to convince me that Lenovo actually doesn’t pay money to Microsoft since they get an OEM license. Knowing that this is not correct, and after the fact that the technician was getting really rude, I asked to speak to a supervisor. The supervisor was even worse and having already spent 45 minutes on the phone, I asked to be transferred to the hardware department again. Once there, I spoke to another lady, explained the situation and how long I have been trying to get this resolved (we are at 55 minutes now) and she happily took my information and sent me the installation disks free of charge.
Conclusion
The setup discussed in this post is an inexpensive and relatively secure way of storing data in your own home/home network. The RAID 1 configuration offers redundancy, while the price of the system does not break the bank.
I am very disappointed with Lenovo, trying to charge me for something I already paid for (the Operating System that is). Luckily the ladies at the hardware department were a lot more accommodating and I got what I wanted in the end.
I hope this guide helped you.