Building a web app with PhalconPHP and AngularJS Part II
This is Part II of a series of posts on building an application using Phalcon and AngularJS. Part I is located here.
I have recently discovered Phalcon and I was impressed with its speed and ease of use. At the time of this writing, PhalconPHP is at version 0.4.2, with some serious redesign coming down the line on 0.5.x.
Phalcon takes a different approach than any other PHP framework (see Zend, Symfony, CakePHP etc.). It is written in C and compiled as a module which is then loaded on your web server. Effectively the whole framework is in memory for you to use, without needing to access the file system so that you can include a file here or a file there.
Advantages
The core advantage of this approach is speed. The framework is in memory, ready to deliver its functionality, so your application is now only concerned about its files and not the framework itself. Once a framework is mature enough for usage, its files don’t change that much. Yet for any of the traditional frameworks, PHP needs to scan the files, load them and the interpret them. This in effect has a serious impact on performance, especially for large projects.
Another advantage is that since the framework is a module on your web server, you don’t need to upload library files to each and every application you install on your host.
Finally, you can mix and match whatever you need, using any of the components as ‘glue’ components rather than the whole framework. Most of the major frameworks also use this methodology for most of their components, however performance still is an issue. Additionally, in the case of any other framework, one might need to upload a very complicated and deep file structure on their web server so as to take advantage of one component to be used in an application.
Disadvantages
Support and bug tracing are the two weaknesses of Phalcon. By support I do not mean support from the developers. On the contrary, the developers are doing a great job listening to the relatively young community, and issuing fixes. However, as with any framework, if you find a bug, you will try to trace the code back to each component in an effort to find a solution to your problem. When developing an application and have access to the source files (the library PHP files like Zend Framework has), not only you can learn from those implementations, but you can quickly fix something that might be broken and continue working. With Phalcon you will need to wait until the next version is released, unless you are fluent in C and play around with the source code. For most PHP programmers (like myself), the process will be report the bug and wait for the fix.
Since the framework is a module on your web server, you will need to be careful on upgrades. If your applications do not take advantage of the latest functionality the framework offers, you might fix something in one application, while breaking something in another. You cannot mix and match versions of Phalcon per application.
Consideration
Phalcon is very young as a framework. It does have a lot of power, but there are a lot of things still missing (for instance relationships between models and a query builder). In time these pieces will be implemented and the framework will grow stronger :)
Implementation
I downloaded the INVO sample application and set it up on my web browser. Using that as a starting point, I started modifying it to fit my needs. I also set up the PhalconPHP developer tools and PHPStorm support.
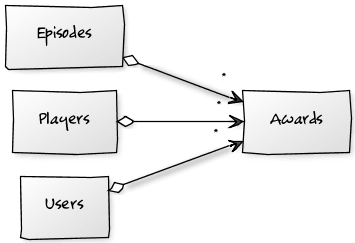
For this application, I needed a table to store information about every podcast episode, a table to store all players and a table to store the users (namely Aaron, Josh and John). The Awards table would be the one that would store all the information regarding the game balls and kick in the balls awards.
Models
Once those were in place I started building my models and relevant controllers/views. Setting a model up was really easy. I would create the table in my database and then run
phalcon create-model --table-name episodes
and my model would be ready for me to use (example below for Episodes).
class Episodes extends Phalcon_Model_Base
{
    public $id;
    public $number;
    public $summary;
    public $airDate;
    public $outcome;
    public $createdAt;
    public $createdAtUserId;
    public $lastUpdate;
    public $lastUpdateUserId;
}
After a while I decided I wanted to keep a track on who created a record and when, and who last updated a record and when for certain tables. After some refactoring I created my own model class that would give me the functionality I needed, and extended that class in relevant models.
My custom class (that would take care of the createdAt, createdAtUserId, lastUpdated, lastUpdatedUserId fields) also took advantage of the beforeSave hook to ensure that these fields were transparently updated. The find and findFirst static functions are used throughout the models and there is no reason to repeat them in each model, so they end up in this custom class. (Comments removed to preserve space)
use NDN_Session as Session;

class NDN_Model extends Phalcon_Model_Base
{
    public $createdAt;
    public $createdAtUserId;
    public $lastUpdate;
    public $lastUpdateUserId;

    public function beforeSave()
    {
        if (empty($this->createdAtUserId)) {
            $auth     = Session::get('auth');
            $datetime = date('Y-m-d H:i:s');

            $this->createdAt        = $datetime;
            $this->createdAtUserId  = (int) $auth['id'];
        }
    }

    static public function find($parameters = array())
    {
        return parent::find($parameters);
    }

    static public function findFirst($parameters = array())
    {
        return parent::findFirst($parameters);
    }
}
Session
Although Phalcon provides a flash messenger utility, I had an issue with using the _forward function on a controller, after an action (say Add or Edit) was completed. Effectively the data would not refresh on screen. To combat that I used _redirect. However, all the messages that I had in the flash messenger (Phalcon_Flash) would disappear. An easy solution was to extend the Phalcon_Session and create two new functions setFlash and getFlash. The setFlash is called whenever I want to set a message for the user to see. The function stores the message in a session variable. Before the controller is dispatched, the getFlash is called to return any messages waiting to be displayed, and after that the messages are cleared from the session and displayed on screen.
class NDN_Session extends Phalcon_Session
{
    public static function setFlash($class, $message, $css)
    {
        $data = array(
            'class'   => $class,
            'message' => $message,
            'css'     => $css,
        );
        self::set('flash', $data);
    }

    public static function getFlash()
    {
        $data = self::get('flash');
        if (is_array($data)) {
            self::remove('flash');
            return $data;
        } else {
            return null;
        }
    }
}
Breadcrumbs
I wanted to show breadcrumbs to the user, as a way to easily navigate throughout the application. To do so, I created my own Breadcrumbs class which holds an array of areas that the user is in. The class has a generate function, which returns back a JSON string. This is to be parsed by AngularJS so as to display the breadcrumbs.
Controllers
I created my controllers using the Phalcon Developer Tools. Whether you use the webtools or the command line makes no difference. The skeleton of the controller is generated for you to use.
Based on the flash messenger and _redirect that I mentioned in the previous section, I had to extend the base controller, so as to add functionality that would allow me to show messages on screen after a redirect. Other reasons for this new class were to allow for a prefix on each page title, generate breadcrumbs and menus.
use Phalcon_Tag as Tag;

use Phalcon_Flash as Flash;
use NDN_Session as Session;

class NDN_Controller extends Phalcon_Controller
{
    protected $_bc = null;
    public function initialize()
    {
        Tag::prependTitle('HHF G&KB Awards | ');
        $this->_bc = new NDN_Breadcrumbs();
    }

    public function beforeDispatch()
    {
        $message = Session::getFlash();
        if (is_array($message)) {
            Flash::$message['class'](
                $message['message'], $message['css']
            );
        }
        $this->view->setVar('breadcrumbs', $this->_bc->generate());
    }

    protected function _constructMenu($controller)
    {
        $commonMenu = array(
            'index'      => 'Home',
            'awards'     => 'Awards',
            'players'    => 'Players',
            'episodes'   => 'Episodes',
            'about'      => 'About',
            'contact'    => 'Contact Us',
        );
        $auth = Session::get('auth');

        $class  = get_class($controller);
        $class  = str_replace('Controller', '', $class);
        $active         = strtolower($class);
        $sessionCaption = ($auth) ? 'Log Out'         : 'Log In';
        $sessionAction  = ($auth) ? '/session/logout' : '/session/index';

        $leftMenu = array();
        foreach ($commonMenu as $link => $text) {
            $isActive   = (bool) ($active == $link);
            $newLink  = ('index' == $link) ? '/' : '/' . $link;
            $leftMenu[] = array(
                'active' => $isActive,
                'link'   => $newLink,
                'text'   => $text,
            );
        }

        $menu = new StdClass();
        $menu->current = $active;
        $menu->left    = $leftMenu;

        if ($auth != false) {
            $sessionCaption .= ' ' . $auth['name'];
        }

        $menu->rightLink = $sessionAction;
        $menu->rightText = $sessionCaption;

        return json_encode($menu);
    }
}
Each controller would extend my base controller. In the initialize function:
- the page title is set,
- the breadcrumbs are added (and generated later on in the
beforeDispatchof the base controller), - the menu is generated and passed to the view for AngularJS to process,
- additional variables would be generated for displaying elements based on whether a user is logged in or not.
Views
Creating the views was really easy. I already had the structure ready from the sample application (INVO) and with the help of Bootstrap CSS, I was done in no time. The views inherit from a base view (index.phtml) located at the root of the views folder. That view holds the skeleton of the web page and content is injected accordingly based on each controller (and its view).
In that file I added the relevant variables that will be used by AngularJS as well as variables that hold conditional elements (i.e. elements that appear when a user is logged in).
More on the views in the next installment of these series.
Conclusion
With all that the application was ready as far as the main structure was concerned. Tying everything with AngularJS was the next step, which will be covered in part III of this How-To.
The whole application, from start to finish, took less than 4 hours to develop. This included breaks, reading the manual and making design decisions based on my ever changing requirements.